

A handmade greeting card is a folded piece of cardstock decorated with cutouts, stamps, drawings, or embellishments to create a personal, one-of-a-kind message — and you can make a simple one in about 30-45 minutes with basic craft supplies you likely already own. The core process is always the same: fold your base card, design the front, add your message inside, and finish with any extra details.
This guide walks through the full process for beginners, several easy techniques to try, common mistakes to avoid, and how to build a small card-making kit so future cards take even less time.
Why Make Cards Instead of Buying Them?
Store-bought cards are convenient, but they’re also generic — the same design sitting on a shelf for anyone to buy. A handmade card signals that you spent actual time on someone, which is exactly why people tend to keep handmade cards long after they’d have thrown a store-bought one away. It also costs less per card once you have basic supplies, especially if you’re making several at once for holidays or a birthday season.
You don’t need to be artistic to make a good card. Simple, clean designs using basic techniques — layered paper, a single stamped image, a hand-lettered word — often look more intentional than an overly complicated design.
What You’ll Need
Basic supplies (enough for most cards):
- Cardstock (for the folded base — heavier weight holds up better than regular paper)
- Scissors and/or a craft knife
- Glue stick or double-sided tape
- Colored pens, markers, or a fine-tip pen for writing
- A ruler for clean, straight folds
Optional, for more variety:
- Patterned scrapbook paper
- Rubber stamps and ink pads
- Washi tape
- Stickers or die-cut shapes
- Watercolor paints or colored pencils
- Ribbon, twine, or small embellishments
You don’t need all of this to start. A single sheet of cardstock, scissors, and a pen are enough for your first card.
Step 1: Cut and Fold Your Base Card (5 Minutes)
Start with a piece of cardstock roughly 8.5 x 11 inches (standard letter size), then fold it in half to create a 5.5 x 8.5 inch card, or cut it down further for a smaller size first. Use a ruler to score a light line along the fold before creasing — this gives you a cleaner, sharper fold than just bending the paper by hand.
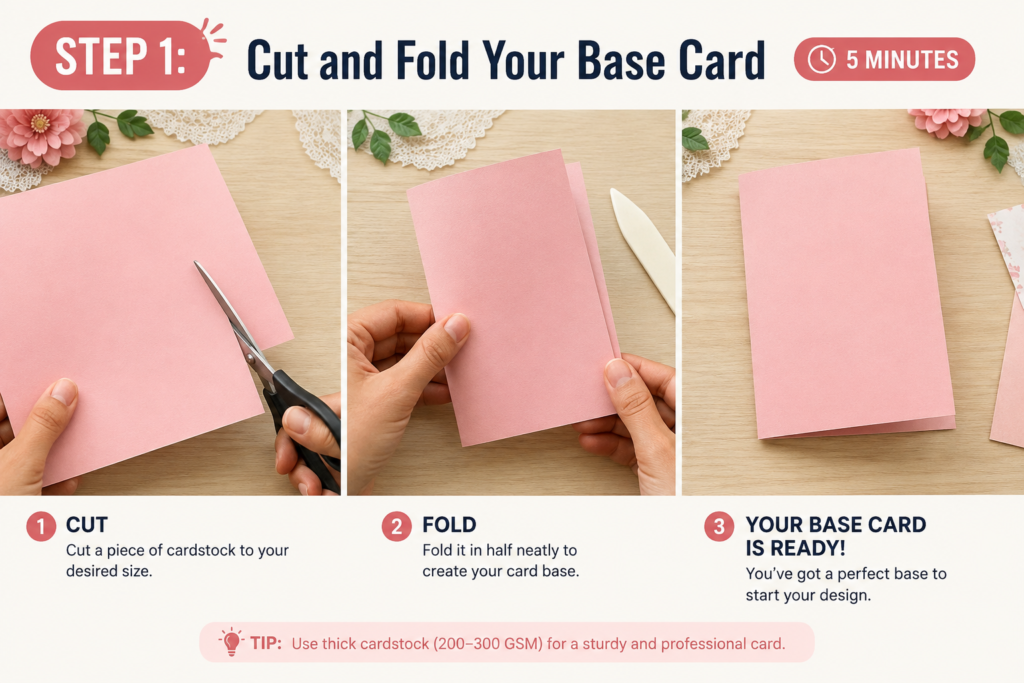
If you want a more standard card size, cut the folded piece down to roughly 4.25 x 5.5 inches, which fits standard envelopes without needing to trim anything later.
Step 2: Plan Your Design Before You Start Gluing (5 Minutes)
Before committing to anything, lightly sketch or lay out your design idea. Decide on:
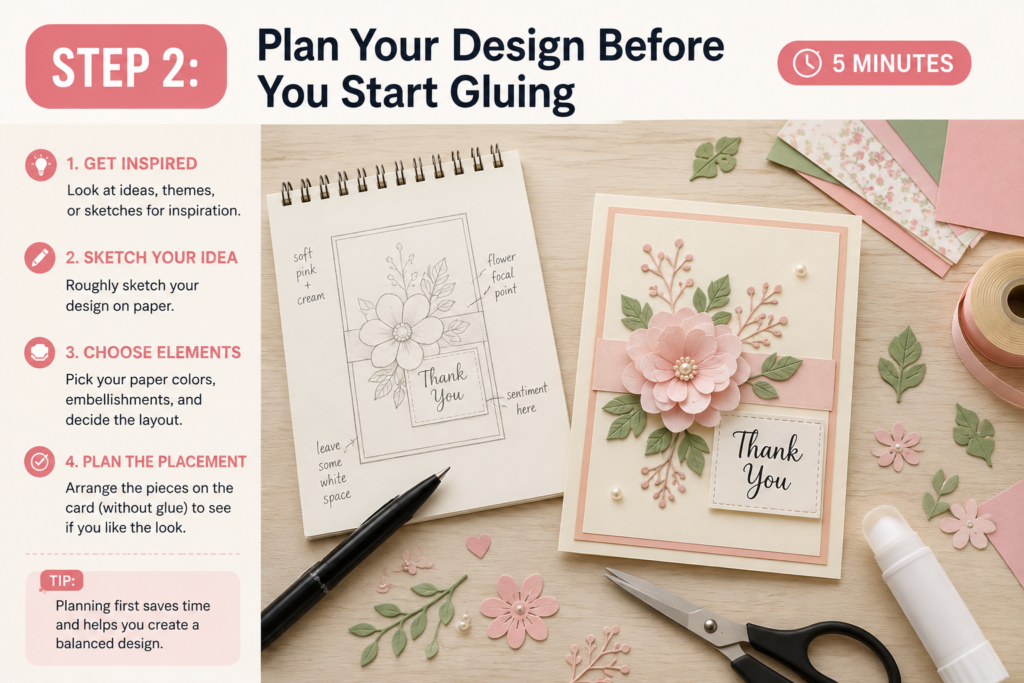
- A color scheme (2-3 colors usually looks more intentional than five)
- Whether the front will be a single focal image/word or a layered design
- Where your message will go on the inside
This step takes a couple of minutes but prevents the most common beginner mistake: starting to glue pieces down and realizing halfway through that the layout doesn’t work.
Step 3: Create the Front Design (15-20 Minutes)
This is where the technique you choose matters most. Here are several beginner-friendly options:
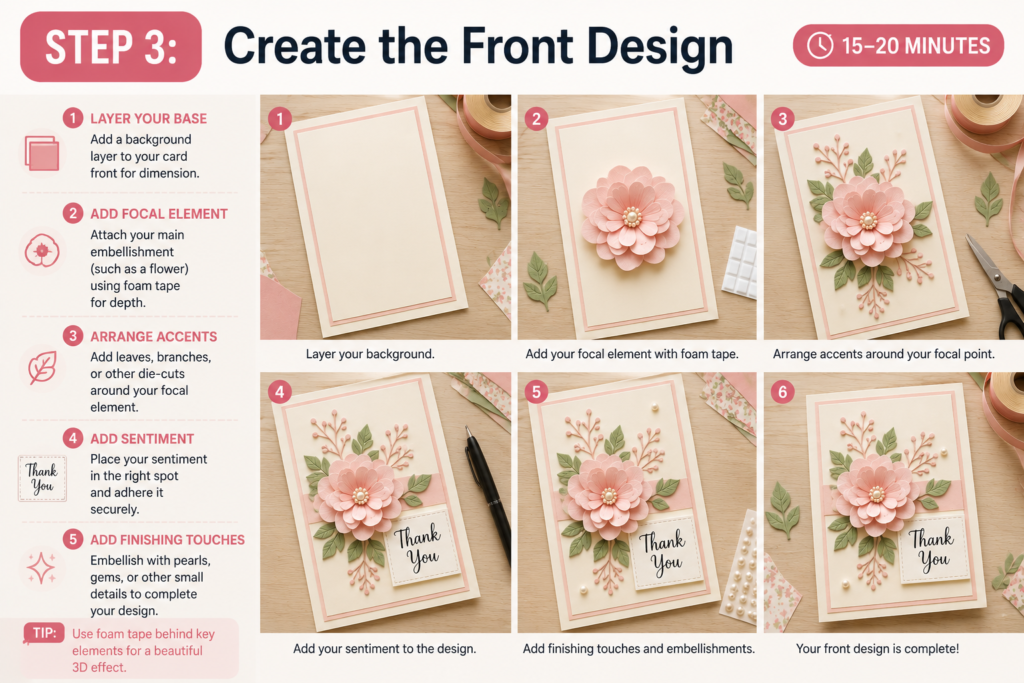
Layered Paper Design
Cut simple shapes (circles, hearts, a basic flower, geometric shapes) from colored or patterned paper and layer them on the card front, largest piece first, working down in size. This is one of the easiest techniques to get a polished-looking result without any drawing skill.
Stamped Design
A single well-placed rubber stamp image, inked and pressed onto the card front, can look more professional than a hand-drawn design — especially for beginners. Center it, or place it slightly off-center with a hand-lettered word alongside it.
Hand-Lettering
Write a single word or short phrase (“Congrats,” “Thank You,” “Happy Birthday”) in your best handwriting, or trace a lightly-penciled guide first if you want cleaner letters. Add a simple border or a few small accent marks around it.
Watercolor or Colored Pencil Design
A loose, simple watercolor wash (a single flower, a wash of color in one corner) or colored pencil design gives a hand-painted feel without needing precise technique — imperfections tend to look intentional in this style.
Whichever technique you pick, resist the urge to fill every inch of the card front. Empty space is part of the design, not something to fix.
Step 4: Write Your Message Inside (5 Minutes)
Keep the inside simple — this is where the card’s actual purpose lives, and an overly decorated inside can distract from the message itself. A short handwritten note, centered or left-aligned, is usually all that’s needed. If you want a bit more design, a single small stamped image or a thin decorative border along the top works well without competing with your words.
Step 5: Add Final Touches and Let It Dry (5-10 Minutes)
Add any last embellishments — a small ribbon tied at the fold, a sticker, a bit of washi tape along an edge. Let any glue or paint fully dry flat before closing the card, so nothing sticks together or smudges.
If you’re mailing the card, check that any 3D embellishments (buttons, thick ribbon, glued-on shapes) aren’t so bulky that the card won’t fit in a standard envelope or will need extra postage.
Common Mistakes to Avoid
- Overcrowding the design. New card-makers often try to use every supply on one card. A clean design with 2-3 elements almost always looks better than a busy one.
- Skipping the fold-scoring step. A hand-folded card without a scored line often creases unevenly, which shows on the finished card.
- Using paper that’s too thin. Regular printer paper doesn’t hold up as a card base — it feels flimsy and doesn’t stand up well on a shelf or table.
- Not planning the layout first. Gluing pieces down one at a time without a plan is the fastest way to end up with an unbalanced design.
- Ignoring envelope size. If you’re using a store-bought envelope, cut your card to fit it before you start decorating, not after.
Card Ideas by Occasion
If you’re not sure where to start, here are a few starting points by occasion:
Birthday: bright colors, a layered paper cake or balloon shape, a bold hand-lettered “Happy Birthday.”
Thank You: a single stamped flower or simple line drawing, muted color palette, a short handwritten note taking up most of the inside.
Sympathy: soft, muted tones (white, sage, soft blue), minimal design — a single small floral element is usually enough. Keep the inside message simple and sincere rather than decorative.
Holiday: seasonal shapes (a tree, a snowflake, a simple wreath) cut from patterned paper, layered with a metallic pen accent.
Just Because: this is the easiest category to experiment with technique, since there’s no occasion-specific expectation — try watercolor, hand-lettering, or a new layering style you haven’t tried yet.
Building a Small Card-Making Kit
If you enjoy this and want to make cards regularly, a small dedicated kit saves time on every future card. A basic kit might include:
- A stack of pre-cut cardstock in a few base colors
- A small selection of patterned paper
- One or two ink pads and a couple of versatile stamps
- A fine-tip black pen and a few colored markers
- A glue stick and a small pair of detail scissors
Keeping this together in one box or bag means your next card takes closer to 15-20 minutes instead of 45, since setup time disappears.
Frequently Asked Questions
Do I need special tools to make greeting cards? No. A basic starter card only needs cardstock, scissors, glue, and a pen. Stamps, patterned paper, and other supplies are nice additions but not required to make a good card.
What size should a handmade card be? 4.25 x 5.5 inches is the standard size that fits common envelopes without trimming, though you can make cards any size if you’re not mailing them or plan to make your own envelope.
How long does it take to make a card from scratch? A simple card takes about 30-45 minutes for a first-timer, including planning and drying time. With practice and a stocked kit, this often drops to 15-20 minutes.
Can I make several cards at once? Yes — many card-makers batch the process, cutting and folding several bases at once, then designing each front individually. This is especially efficient around the holidays when you need multiple cards.
What’s the easiest technique for a beginner? Layered paper shapes tend to be the most forgiving starting technique, since it doesn’t require drawing or steady hands with ink, and simple shapes still look polished once assembled.
Grab a piece of cardstock and try your first card today — start simple, and the technique you enjoy most will become obvious after just a couple of tries.